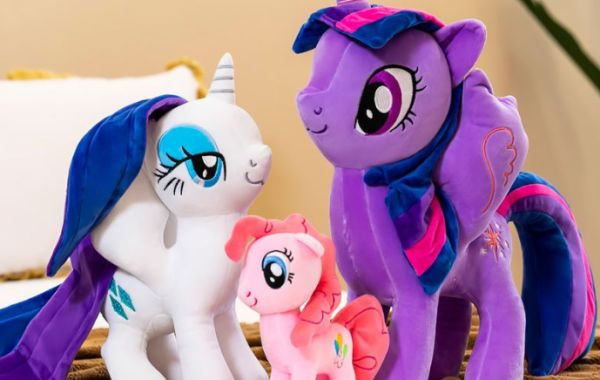
Creating a custom My Little Pony plush toy can be a fun and rewarding project. Here’s a step-by-step guide to help you make your own:
Part 1. Materials Needed:
Fabric: Fleece or minky fabric in various colors (for the body, mane, and tail)
Stuffing: Polyester fiberfill
Thread: Matching colors for sewing, sewing machines, or needle and thread
Scissors, pins, or fabric clips.
Pattern: Create or print a pony template
Fabric markers: For details like eyes and cutie marks
Optional: Safety eyes, felt for details
Part 2. Steps to Make My Little Pony Custom Plush
Step 1: Design Your Pony
Choose a Character: Decide which My Little Pony character you want to create or design your own.
Sketch: Draw a rough sketch of your pony, including the body shape, mane style, and cutie mark.
Step 2: Create the Pattern
Pattern Pieces: Using your sketch, create pattern pieces for the body, head, legs, mane, and tail. Ensure they are proportional to each other.
Cut the Pattern: Cut out the pattern pieces from paper or cardboard.
Step 3: Cut the Fabric
Pin the Pattern: Pin the pattern pieces to the fabric and cut them out carefully.
Fabric Colors: Remember to use different colors for the body, mane, and tail as per your design.
Step 4: Assemble the Plush
Sew the Body: Start by sewing the body pieces together, leaving an opening for stuffing.
Attach Legs: Sew the legs to the body, ensuring they are securely attached.
Create the Head: Sew the head pieces together and attach it to the body.
Sew the Mane and Tail: Attach the mane and tail pieces to the appropriate locations.
Step 5: Add Details
Eyes and Cutie Mark: Use fabric markers or felt to create the eyes and cutie mark. Sew or glue them onto the plush.
Safety Eyes: If you prefer a more three-dimensional look, use safety eyes instead of drawn ones.
Step 6: Stuff and Close
Stuff the Plush: Fill the body and head with stuffing until they are firm but not overly packed.
Close the Opening: Sew the opening closed using a ladder stitch for a clean finish.
Step 7: Final Touches
Check and Adjust: Ensure everything is securely attached and make any final adjustments to the shape.
Groom the Mane: If using fleece, you can style the mane by trimming it to your desired length.
Final Words
Congratulations! You’ve created your own My Little Pony custom plush. Enjoy your new creation or consider gifting it to a friend. If you're satisfied with the results, you might want to explore making more custom plush toys in different designs!
