Item photographs may be the main piece of any online business posting. They pass everything from actual specs on to close to home credits. Besides, photograph quality straightforwardly connects to apparent worth.
Top notch item photography should be possible on a tight spending plan utilizing your iPhone or camera with hardware and materials you may as of now have around the house. This is the way fledglings can take wonderful item photographs that sell in six simple tasks.
Instructions to make great efforts.
Stage 1: Pick the Kind of Photographs You're Shooting
Without the chance to contact, feel, and experience the item face to face prior to purchasing, online customers depend on item photographs to illuminate them completely.
While a straightforward shot of the item against a perfect white foundation can say a ton, it leaves space for questions. How huge is the thing? How would you utilize it? How might it cause the client to feel?
This data can be given through various kinds of makeup photography in bangalore. It's suggested that you transfer however many pictures as it takes to feature each significant detail of your item, which generally implies four to 12 pictures. Most of these ought to be straightforward and enlightening with a plain, non-diverting foundation, in addition to a couple of dynamic shots that show this present reality brilliance of the thing.
Here are the seven principal kinds of item photography shots and how to integrate them:
Studio
Way of life/Setting
Detail
Scale
Bunch
Bundling
Process
Studio shots, likewise called individual shots, give an essential glance at the item without anyone else against a perfect, moderate foundation.
Their motivation is to obviously and alluringly show the thing, frequently from various points. Most studio shots highlight a white background, however elective choices like wood, grass, or stone can mark your pictures and assist with conveying close to home item credits.
This kind of photograph is an unquestionable necessity for any item in each classification. Expect to have three to eight studio shots in your posting.
The Square Photograph Studio application naturally separates your item from the foundation — making perfect, fresh studio shots without an actual studio.
The right mix of these photograph types will give your clients the data and support they need to make a buy certainly.
Shooting numerous styles of shots in various conditions requires making changes in accordance with your arrangement and now and then obtaining different hardware, so it's wise to design your exhibition prior to beginning.
Did you be aware?
Certain commercial centers have rules concerning what is permitted in posting photographs facilitated on their foundation. Amazon, for instance, denies close-up detail shots and lean towards that merchants utilize an unadulterated white foundation. Make certain to realize any pertinent rules prior to shooting to augment your usable pictures.
Stage 2: Set Up Your Photograph Studio
Taking extraordinary beauty photography in bangalore doesn't need a high-financial plan, proficient arrangement — yet you'll require a few things other than your camera or telephone.
Contingent upon your ideal shot and accessible climate, you might require just a recreation area seat and the right climate. Different conditions, nonetheless, require a more complete tool compartment.
As another option, you can dispense with the requirement for your own photograph studio by utilizing the Square Photograph Studio Application. It has implicit instruments to accomplish the ideal point, lighting, foundation, and that's only the tip of the iceberg.
Here are the fundamentals of a Do-It-Yourself photograph studio:
Shooting Table
Clear
Lights
Reflectors
Mount
Risers and Supports
Incidental Things
You'll require a level stage sufficiently huge to handily show the item — this can be your feasting table, your work area, a television plate, a seat, or another comparable surface. In the event that you choose to shoot outside, ensure your shooting table is convenient.
You can likewise buy a committed photography table with an underlying breadth (shrouded in the following tab) for $50-$125, similar to this efficient choice. Movability, sturdiness, and accommodation are the principal advantages of purchasing this stuff, however Do-It-Yourself copies can work comparably well.
With all of your gear close by, you simply have to track down the right space. However long your studio region is sufficiently enormous to house your stuff and subject with adequate space to move around it, the main genuine thought is light.
Our following stage tends to how to pick the ideal place to arrange your shoot and capitalize on the light it gets.
Stage 3: Expert Your Lighting
Lighting is vital to taking incredible beauty photography in bangalore with any camera. Here are a few hints to capitalize on the light you have accessible.
Shoot Outside for Delicate, Regular Light
This is a top item photography tip — A wash of delicate, normal light gives the best variety equilibrium to item photographs and limits cruel shadows.
You can track down the ideal light outside on a cloudy day (when the mists effectively diffuse the daylight pleasantly), or at midmorning and afternoon (when the light strikes from a more modest point).
The unedited item photograph underneath was taken on an outside outdoor table during a cloudy day. This shot was caught utilizing a Samsung Universe cell phone on its programmed setting with no extra gear, and it's essentially ideally suited for an item posting.
Utilize Normal Light From an Enormous Window or Glass Entryway
On the off chance that shooting outside is unimaginable or helpful, attempt the following best thing — setting up inside close to a huge window or glass entryway.
By organizing your shooting table close to a brilliant regular source, you can in any case catch a lot of light. It might should be controlled for your subject to be lit equally without unforgiving shadows, so make certain to have reflectors close by.
Setting up a couple of bits of froth board reflectors can make an incredible window-side stage for your item, similar to the model displayed underneath.
Make Diffused Light Inside
In the event that the ideal regular light isn't open, you can emulate it in various ways. The key is to diffuse — importance to fan out and relax — the light. This limits shadows and upgrades colors in item photography.
For little things, you can do this by utilizing a gadget called a tabletop light tent or light box. They're accessible to buy beginning at under $20 and come total with simple lights.
Obviously, you can assemble one yourself utilizing essential family materials, yet you'll have to supply your own studio lights. Here is a definite manual for build your own Do-It-Yourself light box.
For a more straightforward Do-It-Yourself approach, the masters at BH Photograph Video suggest wrapping paper towels around a photo placement and holding or tying down it to your light as a diffuser. This turns out successfully for items excessively enormous to effectively fit in a standard light box and should be possible with white paper or texture and braces, too.
Do-It-Yourself Diffuser.
This straightforward Do-It-Yourself diffuser is perfect for bigger items.
Allow More To light in With a Stand
While you're running really short on normal light however don't have reasonable studio lighting, adjustment makes it simple to catch fresh, definite item shots without a blaze. This can be achieved with a stand or a Do-It-Yourself settling mount.
Utilizing a gadget's blaze changes tones, disturbs the foundation, and creates hard shaded areas — yet with enough solidness, you can build the openness time all things being equal (which is a setting we'll examine later in this aide). This permits a greater amount of the accessible light to enter the shot over a somewhat longer time frame.
One more in addition to utilizing a stand is that you can set the shade delay so your gadget snaps the photo a couple of moments after you contact the screen. This guarantees sharp, in-center pictures without fail.
Stage 4: Change Your Camera
Incredible beauty photography in bangalore can be taken with practically any cutting edge gadget you have close by (or can get from a companion) — whether it's a computerized camera or your iPhone or Android.
Assuming that you've followed the lighting tips from prior, both gadget choices can be utilized on their programmed, simple to use settings to yield usable shots without any problem.
Assuming your lighting circumstance is not great or you need to tweak your photographs, you can change the picture ascribes by attempting new settings or changing your gadget to manual mode. This is a glance at the way it's finished.
Utilizing Your Telephone's Auto Settings
Changing Your Telephone or Camera's Manual Settings
"The Openness Triangle" is a visual exhibit of the connection between gap, ISO, and shade speed.
"The Openness Triangle" is a visual show of the connection between gap, ISO, and screen speed. Each of the three settings cooperate to accomplish a decent, sufficiently bright photo.
Stage 5: Take Photographs of Your Item
With your studio, lighting, and gadget settings all together, now is the ideal time to shoot.
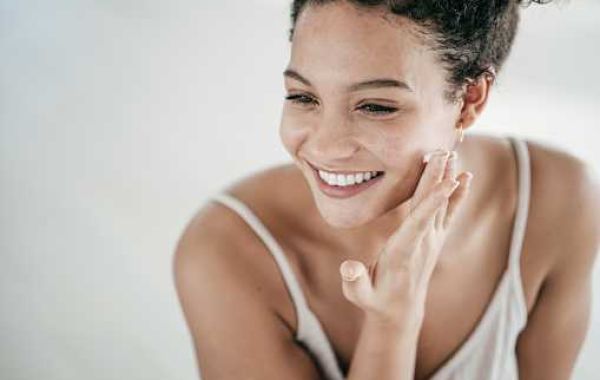
Have your items organized on your set or shooting table utilizing the stands and supports you delivered for your studio. Consider alluring ways of addressing how the item searches in activity, such as eliminating the cover from a container of skin cream and setting it facing the thing's side (as displayed beneath).
आइटम तस्वीरें किसी भी ऑनलाइन व्यापार पोस्टिंग का मुख्य टुकड़ा हो सकता है । वे वास्तविक चश्मे से लेकर होम क्रेडिट के करीब तक सब कुछ पास करते हैं । इसके अलावा, फोटोग्राफ की गुणवत्ता सीधे स्पष्ट मूल्य से जुड़ती है ।
शीर्ष पायदान आइटम फोटोग्राफी आपके आईफोन या कैमरे का उपयोग हार्डवेयर और सामग्रियों के साथ एक तंग खर्च योजना पर संभव होनी चाहिए जो अब आपके पास घर के आसपास हो सकती है । इस तरह से नवेली अद्भुत आइटम तस्वीरें ले सकते हैं जो छह सरल कार्यों में बेचते हैं ।
महान प्रयास करने के निर्देश ।
स्टेज 1: आप जिस तरह की तस्वीरें शूट कर रहे हैं, उसे चुनें
खरीदने से पहले आइटम से संपर्क करने, महसूस करने और अनुभव करने का मौका दिए बिना, ऑनलाइन ग्राहक उन्हें पूरी तरह से रोशन करने के लिए आइटम तस्वीरों पर निर्भर करते हैं ।
जबकि एक सही सफेद नींव के खिलाफ आइटम का एक सीधा शॉट एक टन कह सकता है, यह सवालों के लिए जगह छोड़ देता है । बात कितनी बड़ी है? आप इसका उपयोग कैसे करेंगे? यह ग्राहक को कैसा महसूस करा सकता है?
यह डेटा बैंगलोर में विभिन्न प्रकार की मेकअप फोटोग्राफी के माध्यम से दिया जा सकता है । यह सुझाव दिया गया है कि आप अपने आइटम के प्रत्येक महत्वपूर्ण विवरण को प्रदर्शित करने के लिए कई चित्रों को स्थानांतरित करते हैं, जो आम तौर पर चार से 12 चित्रों का अर्थ है । इनमें से अधिकांश को एक सादे, गैर-डायवर्टिंग नींव के साथ सीधा और ज्ञानवर्धक होना चाहिए, इसके अलावा गतिशील शॉट्स के एक जोड़े के अलावा जो इस वर्तमान वास्तविकता को दिखाते हैं ।
यहां सात प्रमुख प्रकार के आइटम फोटोग्राफी शॉट्स हैं और उन्हें कैसे एकीकृत किया जाए:
स्टूडियो
जीवन/सेटिंग का तरीका
विस्तार से
स्केल
बंच
बंडलिंग
प्रक्रिया
स्टूडियो शॉट्स, इसी तरह व्यक्तिगत शॉट्स कहा जाता है, एक आदर्श, मध्यम नींव के खिलाफ किसी और के बिना आइटम पर एक आवश्यक नज़र देते हैं ।
उनकी प्रेरणा स्पष्ट रूप से और आकर्षक रूप से बात को दिखाना है, अक्सर विभिन्न बिंदुओं से । अधिकांश स्टूडियो शॉट्स एक सफेद पृष्ठभूमि को उजागर करते हैं, हालांकि लकड़ी, घास या पत्थर जैसे वैकल्पिक विकल्प आपके चित्रों को चिह्नित कर सकते हैं और होम आइटम क्रेडिट के करीब पहुंचने में सहायता कर सकते हैं ।
इस तरह की तस्वीर प्रत्येक वर्गीकरण में किसी भी वस्तु के लिए एक निर्विवाद आवश्यकता है । अपनी पोस्टिंग में तीन से आठ स्टूडियो शॉट्स की अपेक्षा करें ।
स्क्वायर फोटोग्राफ स्टूडियो एप्लिकेशन स्वाभाविक रूप से आपके आइटम को नींव से अलग करता है — एक वास्तविक स्टूडियो के बिना सही, ताजा स्टूडियो शॉट्स बनाना ।
इन फोटोग्राफ प्रकारों का सही मिश्रण आपके ग्राहकों को निश्चित रूप से खरीदारी करने के लिए आवश्यक डेटा और समर्थन देगा ।
विभिन्न परिस्थितियों में शॉट्स की कई शैलियों की शूटिंग के लिए आपकी व्यवस्था के अनुसार परिवर्तन करने और अब और फिर विभिन्न हार्डवेयर प्राप्त करने की आवश्यकता होती है, इसलिए शुरुआत से पहले अपनी प्रदर्शनी को डिजाइन करना बुद्धिमानी है ।
क्या आपको पता था?
कुछ वाणिज्यिक केंद्रों में नियम हैं कि उनकी नींव पर फोटो पोस्ट करने की अनुमति क्या है । उदाहरण के लिए, अमेज़ॅन, क्लोज-अप डिटेल शॉट्स से इनकार करता है और उस व्यापारी की ओर झुकता है जो एक अनधिकृत सफेद नींव का उपयोग करता है । अपने प्रयोग करने योग्य चित्रों को बढ़ाने के लिए शूटिंग से पहले किसी भी प्रासंगिक नियमों का एहसास करना सुनिश्चित करें ।
स्टेज 2: अपना फोटोग्राफ स्टूडियो सेट करें
बैंगलोर में असाधारण सौंदर्य फोटोग्राफी लेने के लिए एक उच्च-वित्तीय योजना, कुशल व्यवस्था की आवश्यकता नहीं है — फिर भी आपको अपने कैमरे या टेलीफोन के अलावा कुछ चीजों की आवश्यकता होगी ।
अपने आदर्श शॉट और सुलभ जलवायु पर आकस्मिक, आपको केवल एक मनोरंजन क्षेत्र की सीट और सही जलवायु की आवश्यकता हो सकती है । विभिन्न स्थितियों, फिर भी, एक अधिक पूर्ण उपकरण डिब्बे की आवश्यकता होती है ।
एक अन्य विकल्प के रूप में, आप स्क्वायर फोटोग्राफ स्टूडियो एप्लिकेशन का उपयोग करके अपने स्वयं के फोटोग्राफ स्टूडियो की आवश्यकता को दूर कर सकते हैं । इसमें आदर्श बिंदु, प्रकाश व्यवस्था, नींव को पूरा करने के लिए निहित उपकरण हैं, और यह केवल हिमशैल का सिरा है ।
यहाँ एक डू-इट-खुद फोटोग्राफ स्टूडियो के मूल तत्व हैं:
शूटिंग टेबल
स्पष्ट
रोशनी
रिफ्लेक्टर
माउंट
राइजर और सपोर्ट
आकस्मिक बातें
आइटम को आसानी से दिखाने के लिए आपको एक स्तर के चरण की आवश्यकता होगी — यह आपकी दावत की मेज, आपका कार्य क्षेत्र, एक टेलीविजन प्लेट, एक सीट या अन्य तुलनीय सतह हो सकती है । इस घटना में कि आप बाहर शूट करना चुनते हैं, सुनिश्चित करें कि आपकी शूटिंग टेबल सुविधाजनक है ।
आप इसी तरह इस कुशल विकल्प के समान $50-$125 के लिए एक अंतर्निहित चौड़ाई (निम्न टैब में डूबा हुआ) के साथ एक प्रतिबद्ध फोटोग्राफी तालिका खरीद सकते हैं । गतिशीलता, मजबूती और आवास इस सामान को खरीदने के प्रमुख लाभ हैं, हालांकि यह स्वयं की प्रतियां तुलनात्मक रूप से अच्छी तरह से काम कर सकती हैं ।
आपके सभी गियर पास होने के साथ, आपको बस सही स्थान को ट्रैक करना होगा । हालांकि लंबे समय तक आपका स्टूडियो क्षेत्र आपके सामान को रखने के लिए पर्याप्त रूप से विशाल है और इसके चारों ओर घूमने के लिए पर्याप्त जगह है, मुख्य वास्तविक विचार प्रकाश है ।
हमारा निम्नलिखित चरण यह बताता है कि अपने शूट को व्यवस्थित करने के लिए आदर्श स्थान कैसे चुनें और इसे मिलने वाली रोशनी को भुनाने के लिए ।
चरण 3: विशेषज्ञ अपने प्रकाश
प्रकाश किसी भी कैमरे के साथ बैंगलोर में अविश्वसनीय सौंदर्य फोटोग्राफी लेने के लिए महत्वपूर्ण है । आपके द्वारा सुलभ प्रकाश को भुनाने के लिए यहां कुछ संकेत दिए गए हैं ।
नाजुक, नियमित प्रकाश के लिए बाहर गोली मारो
यह एक शीर्ष आइटम फोटोग्राफी टिप है — नाजुक, सामान्य प्रकाश का एक धोने आइटम तस्वीरों के लिए सबसे अच्छी विविधता संतुलन देता है और क्रूर छाया को सीमित करता है ।
आप बादल वाले दिन (जब धुंध प्रभावी रूप से दिन के उजाले को सुखद रूप से फैलाते हैं), या मध्य सुबह और दोपहर में (जब प्रकाश अधिक मामूली बिंदु से टकराता है) के बाहर आदर्श प्रकाश को ट्रैक कर सकते हैं ।
नीचे दी गई असंपादित वस्तु की तस्वीर एक बादल के दिन के दौरान एक बाहरी आउटडोर टेबल पर ली गई थी । यह शॉट बिना किसी अतिरिक्त गियर के अपनी प्रोग्राम की गई सेटिंग पर सैमसंग यूनिवर्स सेल फोन का उपयोग करते हुए पकड़ा गया था, और यह अनिवार्य रूप से एक आइटम पोस्टिंग के लिए आदर्श रूप से अनुकूल है ।
एक विशाल खिड़की या कांच के प्रवेश द्वार से सामान्य प्रकाश का उपयोग करें
बंद मौके पर कि बाहर शूटिंग अकल्पनीय या सहायक है, निम्नलिखित सबसे अच्छी बात का प्रयास करें — एक विशाल खिड़की या कांच के प्रवेश द्वार के करीब अंदर स्थापित करना ।
अपनी शूटिंग टेबल को एक शानदार नियमित स्रोत के करीब व्यवस्थित करके, आप किसी भी मामले में बहुत अधिक प्रकाश पकड़ सकते हैं । यह आपके विषय को अक्षम्य छाया के बिना समान रूप से जलाए जाने के लिए नियंत्रित किया जाना चाहिए, इसलिए रिफ्लेक्टर को पास करना सुनिश्चित करें ।
फ्रॉथ बोर्ड रिफ्लेक्टर के कुछ बिट्स सेट करना आपके आइटम के लिए एक अविश्वसनीय विंडो-साइड स्टेज बना सकता है, जो नीचे प्रदर्शित मॉडल के समान है ।
अंदर विसरित प्रकाश बनाएं
इस घटना में कि आदर्श नियमित प्रकाश खुला नहीं है, आप इसे विभिन्न तरीकों से अनुकरण कर सकते हैं । कुंजी फैलाना है — प्रकाश को बाहर निकालने और आराम करने के लिए महत्व । यह आइटम फोटोग्राफी में छाया और उन्नयन रंगों को सीमित करता है ।
छोटी चीजों के लिए, आप टेबलटॉप लाइट टेंट या लाइट बॉक्स नामक गैजेट का उपयोग करके ऐसा कर सकते हैं । वे $20 से कम की शुरुआत में खरीदने के लिए सुलभ हैं और साधारण रोशनी के साथ आते हैं ।
जाहिर है, आप आवश्यक पारिवारिक सामग्रियों का उपयोग करके स्वयं को इकट्ठा कर सकते हैं, फिर भी आपको अपनी स्टूडियो रोशनी की आपूर्ति करनी होगी । यहाँ के लिए एक निश्चित मैनुअल है अपना खुद का करो-खुद लाइट बॉक्स बनाएं.
अधिक सरल डू-इट-खुद दृष्टिकोण के लिए, बी एंड एच फोटोग्राफ वीडियो के स्वामी एक फोटो प्लेसमेंट के चारों ओर पेपर तौलिए लपेटने और इसे डिफ्यूज़र के रूप में अपने प्रकाश में रखने या बांधने का सुझाव देते हैं । यह एक मानक प्रकाश बॉक्स में प्रभावी ढंग से फिट होने के लिए अत्यधिक भारी वस्तुओं के लिए सफलतापूर्वक निकलता है और श्वेत पत्र या बनावट और ब्रेसिज़ के साथ भी संभव होना चाहिए ।
डू-इट-खुद डिफ्यूज़र।
यह सीधा-सीधा डू-इट-खुद डिफ्यूज़र बड़ी वस्तुओं के लिए एकदम सही है ।
एक स्टैंड के साथ अधिक प्रकाश की अनुमति दें
जबकि आप सामान्य प्रकाश पर वास्तव में कम चल रहे हैं, लेकिन उचित स्टूडियो प्रकाश व्यवस्था नहीं है, समायोजन एक ज्वाला के बिना ताजा, निश्चित आइटम शॉट्स को पकड़ना आसान बनाता है । यह एक स्टैंड या डू-इट-खुद सेटलिंग माउंट के साथ प्राप्त किया जा सकता है ।
गैजेट के ब्लेज़ का उपयोग करने से टोन बदल जाता है, नींव को परेशान करता है, और कठोर छायांकित क्षेत्र बनाता है — फिर भी पर्याप्त ठोसता के साथ, आप खुलेपन के समय का निर्माण कर सकते हैं सभी चीजें समान हैं (जो एक सेटिंग है जिसे हम बाद में इस सहयोगी में जांचेंगे) । यह कुछ हद तक लंबी समय सीमा पर शॉट में प्रवेश करने के लिए सुलभ प्रकाश की अधिक मात्रा की अनुमति देता है ।
स्टैंड का उपयोग करने के अलावा एक और यह है कि आप शेड विलंब सेट कर सकते हैं ताकि स्क्रीन से संपर्क करने के बाद आपका गैजेट फोटो को कुछ क्षणों में छीन ले । यह बिना असफलता के तेज, इन-सेंटर चित्रों की गारंटी देता है ।
स्टेज 4: अपना कैमरा बदलें
बैंगलोर में अतुल्य सौंदर्य फोटोग्राफी को व्यावहारिक रूप से किसी भी अत्याधुनिक गैजेट के साथ लिया जा सकता है जो आपके पास है (या एक साथी से प्राप्त कर सकते हैं) — चाहे वह कम्प्यूटरीकृत कैमरा हो या आपका आईफोन या एंड्रॉइड ।
यह मानते हुए कि आपने पहले से प्रकाश युक्तियों का पालन किया है, दोनों गैजेट विकल्पों का उपयोग उनके प्रोग्राम पर किया जा सकता है, बिना किसी समस्या के उपयोग करने योग्य शॉट्स प्राप्त करने के लिए सेटिंग्स का उपयोग करना आसान है ।
यह मानते हुए कि आपकी प्रकाश परिस्थिति बहुत अच्छी नहीं है या आपको अपनी तस्वीरों को ट्विक करने की आवश्यकता है, आप नई सेटिंग्स का प्रयास करके या अपने गैजेट को मैन्युअल मोड में बदलकर चित्र को बदल सकते हैं । यह समाप्त होने के तरीके पर एक नज़र है ।
अपने टेलीफोन की ऑटो सेटिंग्स का उपयोग करना
अपने टेलीफोन या कैमरे की मैन्युअल सेटिंग बदलना
"द ओपननेस ट्रायंगल" गैप, आईएसओ और शेड स्पीड के बीच संबंध का एक दृश्य प्रदर्शन है ।
"खुलापन त्रिकोण" गैप, आईएसओ और स्क्रीन गति के बीच संबंध का एक दृश्य शो है । तीन सेटिंग्स में से प्रत्येक एक सभ्य, पर्याप्त उज्ज्वल तस्वीर को पूरा करने के लिए सहयोग करता है ।
स्टेज 5: अपने आइटम की तस्वीरें लें
अपने स्टूडियो, प्रकाश व्यवस्था और गैजेट सेटिंग्स के साथ, अब शूट करने का आदर्श समय है ।
अपने आइटम को अपने सेट या शूटिंग टेबल पर व्यवस्थित करें और अपने स्टूडियो के लिए वितरित किए गए स्टैंड और समर्थन का उपयोग करें । गतिविधि में आइटम कैसे खोजता है, इसे संबोधित करने के आकर्षक तरीकों पर विचार करें, जैसे कि त्वचा क्रीम के एक कंटेनर से कवर को खत्म करना और इसे चीज़ के पक्ष का सामना करना पड़ रहा है (जैसा कि नीचे प्रदर्शित किया गया है) ।