QuickBooks is one of the most popular accounting software solutions, but it requires seamless communication with your network to perform certain functions. Unfortunately, sometimes Windows Firewall may block QuickBooks, causing connectivity issues and errors like being unable to access company files or update the software. If you're facing this issue, don’t worry—this guide will show you how to fix Windows Firewall settings to allow QuickBooks access.
Understanding the Problem
Windows Firewall is a built-in security feature designed to protect your computer from unauthorized access and potential threats. However, it can sometimes misinterpret QuickBooks' network communication as suspicious activity, leading to blocked connections. When this happens, you may encounter issues such as:
- Inability to open QuickBooks multi-user mode.
- Errors when accessing company files on a shared network.
- Problems with QuickBooks updates or Payroll services.
- Hindered integration with third-party applications.
Resolving this problem requires configuring Windows Firewall to permit QuickBooks-related connections without compromising your system’s security.
How to Fix Windows Firewall Settings for QuickBooks
Follow these steps to allow QuickBooks access through Windows Firewall:
Step 1: Add QuickBooks Ports to Windows Firewall
QuickBooks Desktop uses specific ports to communicate with your network. Configuring these ports ensures uninterrupted communication.
Determine Your QuickBooks Ports
Each version of QuickBooks uses different ports. Follow these steps to find your version's ports:- Open QuickBooks Desktop.
- Press
F2orCtrl+1to open the Product Information Window. - Note the year/version (e.g., QuickBooks Desktop 2024).
Alternatively, you can refer to QuickBooks' official documentation for a detailed list of ports.
Open the Ports in Windows Firewall
- Press
Windows + R, type Control Panel, and hit Enter. - Navigate to System and Security Windows Defender Firewall.
- Select Advanced Settings from the left panel.
- Right-click on Inbound Rules, then select New Rule.
- Choose Port and click Next.
- Select TCP, enter the port number(s) specific to your QuickBooks version, and click Next.
- Select Allow the Connection and click Next.
- Name the rule (e.g., “QuickBooks Inbound Rule”) and click Finish.
Repeat these steps for Outbound Rules as well.
- Press
Step 2: Allow QuickBooks Programs Through the Firewall
In addition to opening ports, you may need to allow the QuickBooks program itself through Windows Firewall.

- Go to the Control Panel System and Security Windows Defender Firewall.
- Click Allow an app or feature through Windows Defender Firewall.
- Select Change settings.
- Look for QuickBooks in the list. If it's not there, click Allow another app and browse to the QuickBooks installation folder (e.g.,
C:\Program Files\Intuit\QuickBooks). - Select QuickBooks and click Add.
- Ensure both Private and Public checkboxes are ticked.
- Click OK to save your changes.
Learn more:- QuickBooks Payroll Error 30001
Step 3: Verify QuickBooks Database Server Configuration
If you’re using QuickBooks in multi-user mode, you’ll need to ensure the QuickBooks Database Server Manager is correctly set up.

Open QuickBooks Database Server Manager:
- Press
Windows + S, type Database Server Manager, and open the tool.
- Press
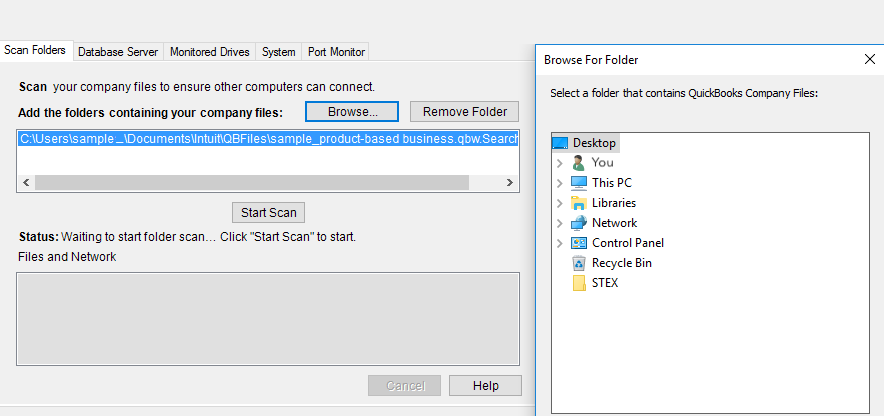
Scan your company file folders:
- Click Scan Folders.
- Add the folder where your company files are stored, then click Scan.
Ensure the service is running:
- Press
Windows + R, type services.msc, and hit Enter. - Locate QuickBooksDBXX (where “XX” represents your QuickBooks version).
- Ensure its status is set to Running.
- Press
Step 4: Test Connectivity
Once you've made the necessary adjustments, it’s time to test QuickBooks’ connectivity.
- Open QuickBooks in multi-user mode or try accessing your company file from another computer.
- Check if the errors or connectivity issues persist.
- If the problem persists, revisit your firewall settings and double-check all configurations.
Additional Troubleshooting Tips
If the steps above don’t resolve the issue, consider the following tips:
- Update QuickBooks: Ensure you’re running the latest version of QuickBooks, as updates often include fixes for common bugs and connectivity issues.
- Disable Third-Party Antivirus: Temporarily disable your antivirus software, as it may also block QuickBooks. Remember to re-enable it after troubleshooting.
- Consult a Professional: If you’re still facing problems, reach out to a QuickBooks ProAdvisor or IT professional for assistance.
Conclusion
Allowing QuickBooks through Windows Firewall is a crucial step in ensuring smooth operations, especially in multi-user environments. By following the steps outlined in this guide—configuring ports, permitting the program, and verifying database server settings—you can resolve connectivity issues effectively.


